Feeds:
Posts
Comments

The Crafty Kitty |Organic Soul Lickety Split Bag

I have been waiting for an opportunity to use the wonderful GOTS certifed ‘Organic Soul’ collection by Amy Butler, so I was really pleased, when my sister in law chose it for the bag I was making her for her birthday. For a number of reasons, it is actually now a belated birthday present, but, well, good things are worth the wait-right?

The Crafty Kitty |Organic Soul Lickety Split Bag

The pattern I used was The Lickety Split Bag from Made by Rae. The bag is fully reversible, so you can choose which patterns you want on show from each day to the next. This pattern was so easy to use and I chose to make each half of the bag from a different fabric. One side features Pine, English Garden with a Grass, Trailing Orchid Pocket and Turquoise, Peacock Feathers with Grass, Temple Doors pocket. The other side features Grass, Trailing Orchid with a Pine, English Garden pocket and Grass, Temple Doors with a Lime Peel, Night Tree pocket. The central ties are also made from Lime Peel, Night Tree. I used organic cotton thread in Sea Foam (Shade 4820).

The Crafty Kitty |Organic Soul Lickety Split Bag

My favourite part of the bag is this pocket featuring Lime Peel, Night Tree. I am actually going to make a washi dress from this fabric. It is cut out and just waiting for me to sew it up!

The Crafty Kitty |Organic Soul Lickety Split Bag

The ties for this bag make it really versatile as you can tie them separately onto your buggy or tie them together at different lengths to make a shoulder bag.

Stitch Organics|Organic Soul Fat Quarter Bundle

There are also a few fat quarter bundles, of these five prints from the Organic Soul Collection, over in the Shop.

Covert Robin

it’s time to sign up for this year’s covert robin!

the covert robin button
You can find out more about the covert robin over at my new blog location and don’t forget to update your bookmarks and blog subscription so you can keep up to date on what is happening at the crafty kitty!

heart-shaped biscuits

The Crafty Kitty | Heart Shaped Biscuit

This little activity happened rather spontaneously. Lily had been talking about making heart shaped cookies on the way to school and then I went to our local shop and discovered (unsurprisingly, considering the time of year!) a set of, reasonably priced, heart shaped cookie cutters. We used the sugar cookie cut-outs recipe from Vegan Cookies Invade Your Cookie Jar. The cookies are decorated using “red” icing (I have serious issues with this food colour at the moment!) along with vegan: organic white chocolate chips, organic chocolate cereal hearts, organic sugar mimosas and some great sprinkles from Lakeland. I kinda find it amusing that they turned into a bit of a gory bleeding heart due to the colour and excessive icing.

I was so pleased to find this range of cake decorations in Lakeland, they are pretty accessible being on the high street and they didn’t cost a fortune AND they actually have on the label that they are Vegan. I finally went to go and buy some only to find out they are discontinuing the range. So please go complain to them that they need to keep them in stock!

The Crafty Kitty | Decorating Biscuits

I thought I would try a little experiment to see if Isaac would want to try his hands at decorating too. I figured worst case scenario: he eats all the toppings, icing and biscuits separately-no big deal! First step: drizzling on icing… no problem.

The Crafty Kitty | Decorating Biscuits

Next step, take a decoration and put it on the biscuit… I demonstrated and then…

The Crafty Kitty | Decorating Biscuits

Yep… he just put it in his mouth… This happened a few more times, until finally…

The Crafty Kitty | Decorating Biscuits

Some toppings landed on the biscuit! Only to be immediately picked up and popped into his mouth! Ah well! He still seemed to have a really good time and enjoyed being included in the activity.

The Crafty Kitty | 'Reading' The Ingredients List

Lily actually helped me make the cookies as well. Here she is ‘reading’ the ingredients. I forget now what she said we needed to make them. Some days she says the right sort of ingredients and some days it is all a bit random. I think I might miss her instructions when she can actually read!

I am a teensy weensy bit late with posting this nature detectives post. I arrived at Thursday last week and realised I didn’t seem to have received the email challenge (disclaimer: it is possible I accidentally archived or deleted the email thinking it was the previous week’s). Anyways… It was all about CLOUDS! Lily and I decided to try out a little experiment that was linked to on the club challenge page.

The Crafty Kitty | Making Clouds

The first thing you have to do is is get your foil tin really cold…

The Crafty Kitty | Making Clouds

Then stick it on top of a glass that has a little warm water in the bottom…

The Crafty Kitty | Making Clouds

and wait and watch…

The Crafty Kitty | Making Clouds

Our glass got a little cloudy, but we weren’t sure if this was what was meant to happen or not. There weren’t any pictures to show you what you should get. I guess in my head I thought maybe there might be some sort of cool cloud that formed and hung in the top of the glass… My confusion meant that Lily was just saying “It’s not working!” and we gave up!

The Crafty Kitty | Weather Board

Another activity was to keep a weather diary. I thought that this might be quite fun for Lily, but the diary on the website was a little bit too advanced, so instead I patched up our weather board that Isaac “The Destructor” had gotten his hands on (by moving furniture around and climbing up to get it, I might add!!) and we chose the weather for the day.

The Crafty Kitty | Weather Board

This fabulous weather board is a free printable over at Mr Printables, which I came across a little while ago.

Lily’s pre-school has a weather board and if they are the leader that day, they get to choose the weather and then they all sing a little “what is the weather today?” song so she is really into that right now. She always gets really excited when we get to put SNOWY on the weather board (it has happened quite a lot over the last month or so!) although on this day, she insisted on changing the weather board about 10 minutes later as it had stopped snowing!

This week’s nature detectives challenge is all about valentines and I am having a little get together with some friends to do some nature crafts with the kiddies and a little valentines nature craft too, which should be fun if a little chaotic!


The Crafty Kitty | Schoolhouse Tunic

I have been waiting to find the time to sew up the Schoolhouse Tunic for almost a year now! In fact I planned to sew it up during Spring Top Sewalong 2012. It also seemed the perfect project to use this wonderful Walkabout print from Cloud9’s Alegria collection, that was designed by the super talented Geninne Zlatkis.

As usual with Meg’s Patterns, the tunic came together really easily. I made the US size 4 (UK size 8) and when I tried on the top half  it seemed to fit wonderfully. I am only 5ft 1, and therefore quite petite! I am quite small on the waist, but larger on the bust and well, sad to admit rather large around the hip/bottom area currently! Too much baking and not enough running!

Needless to say, the looser fit around the midriff, wasn’t as flattering as it could be. I think this is where you are usually meant to create a muslin, if you aren’t a standard size! Obviously I rushed ahead and didn’t bother! I did a quick fix, using the size 4 as a guide, to take in the sides and it fits much better, if a smidge cosier around the bust. I’ve been eyeing up a Craftsy Course: Sew the Perfect Fit, which might give me the knowledge I need to tailor clothing to my particular body shape. Otherwise, I absolutely love this top and everyone who has seen it has commented on the fabric print. Cue another dodgy looking self portrait on timer…

The Crafty Kitty | Schoolhouse Tunic

The Schoolhouse Tunic sewing pattern is now available from my shop Stitch Organics, along with Luminaries Quilt Sewing PatternFlora Tunic and Twirly Skirt Sewing Pattern and Woodlands Shirt Sewing Pattern. You can see my version of the Woodlands Shirt here.

Waaay back in October, I made a lovely pair of dungarees for my son during KCWC Fall 2012. Lately it seems that my time is very thinly spread between caring for my family and household (the latter not so much-you don’t want to see my house right now!), running my online store (which I LOVE!) and squeezing in a little bit of crafting, where I can. Consequently there doesn’t appear to be too much time for writing actual blog posts. Although, I am working on this, just another 18 back dated posts to write up!

The Crafty Kitty | Big Butt Baby Dungarees

I did a bit of a mash up between the big butt baby pants and a pair of dungarees in Ottobre. The main fabric is an organic cotton fairtrade heavy denim and the lining fabric is an organic stretch jersey in a star print.

The Crafty Kitty | Big Butt Baby Dungarees

As you can see, the dungarees are fully lined and they have an adjustable waistband. I used button hole elastic and eco-buttons, which are made from recycled polyester and cotton fibres. I wasn’t sure exactly how I was going to do the back of the dungarees, so I actually taped together the bbbp pattern pieces, but now I would definitely keep the rear panel separate and have a smidge more room in the back, although these dungarees fit wonderfully over a cloth nappy still. I made the largest size, which worked out well, as both fabrics are a little thick, so it reduces the size a little. These dungarees, are one of my favourite items of clothing, that I have made for my son and they still fit fine now he is 18 months old.

The Crafty Kitty | Big Butt Baby Dungarees

You can actually fasten the straps either crossed at the back or just leave them straight over the shoulder. The way I attached the lining fabric, allows you to fold up the legs if they are a little long, revealing the gorgeous star fabric. The straps fasten with a popper (I will get over my button hole fear this year-I promise) and I added a new popper today as the trousers have been a little snug on their previous setting!

The Crafty Kitty | Big Butt Baby Dungarees

I have had the wonderful Washi Dress pattern in my shop since November, but I only managed to get around to sewing my own in January. You know what, I absolutely love it!!

The Crafty Kitty | Organic Voile Washi Dress

I had a pdf version of the pattern, so I had to spend a bit of time piecing it together. That was probably as tricky as it got, to be honest! I made the size S and the fit is pretty spot on. I find that with the cut out, it can be a little impractical as I am always bending over to pick up toys or a child and so I feel like it is a touch low without a top underneath. However, if I was just going out shopping or for a meal, then it wouldn’t bother me! Being all of five foot one, I probably could do with shortening the length of the dress, to be the most flattering length, but I quite like it being longer, so I will probably leave it for now. I also left the sleeves ungathered, hopefully I will get around to making a nice jersey version and then I probably will gather the cuffs of the sleeves.

The Crafty Kitty | Washi Dress Shirring

The Washi Dress, called for shirring, something I have never up until this point been successful with. I found this lovely video tutorial about how to adjust the bobbin tension on a brother machine, to fix this apparently very common problem for brother sewists. Initially, I tightened the bobbin fully and the shirring was too tight, so I halved the number of turns and that seemed right to me. You might be able to tell that this isn’t the main fabric I used, I actually decided to fully shirr the lining fabric as well.

The Crafty Kitty | Washi Dress hands in pockets

I also kept the pockets on the lining piece, as I thought perhaps with the voile being so thin, it might help make them a little sturdier, but they do feel quite bulky, so I think I will remove them at some point and just have the voile pocket.

So, a little bit more about what I used. The main fabric is an organic cotton voile printed using herbal dyes in a paisley print. The lining is organic cotton batiste and the dress was sewn together using organic cotton thread. Both of these fabrics are ridiculous soft and feel so luxurious to wear! You can find tutorials for the sleeves here and for lining the dress here.

The Crafty Kitty | Washi Dress with Cardigan

Now I just need a new long sleeved cardigan that matches!

This is one of those, guess what I made for Christmas posts! I am aware that it is now February, but I forgot to take photos before I gave the gift away!


The Crafty Kitty | Felt Cat Android Tablet Sleeve (Close Up)

I came across these wonderful felt ipad/iphone sleeves by BoutiqueID on Etsy and I thought that the cat version would make an awesome gift for my mum for Christmas, as she only recently got her Android Tablet. Unfortunately, I had left it a little bit too late to buy and I couldn’t really afford to pay the price tag. So I set about creating my own templates using the photos of the finished product. My husband made me a cardboard mock up of the tablet, so I could check the sizing.

The Crafty Kitty | Felt Cat Android Tablet Sleeve (Inside)

The sleeve is made from Kunin Eco-fi felt and sewn together using organic cotton sewing thread. Like the original item, I included a pocket, but I decided to use a magnetic snap closure. It looks really smart but the magnet is really strong, so it is a little awkward to open. I also went a little cautious, so the sleeve is a touch too big for the tablet, but not so much that it is a major issue. I was really pleased with how this turned out, although it took a REALLY long time to get the templates right for the cat face!

The Crafty Kitty | Felt Cat Android Tablet Sleeve

This week’s nature detectives challenge was “which birds can you spot?” and also tied in with the RSPB’s Big Garden Birdwatch. I was hoping to make some pinecone bird feeders, but my parents didn’t end up visiting, and also bringing with them the giant pine cones I had asked for. Honestly, I can never find the right ones in our local forest. I must be looking in the wrong place. Anyway, hopefully we will get a chance to make them this weekend instead and we can do a little birdwatching in our own garden!

I had hoped to start off the activity by watching a programme on BBC iPlayer about birds, but there didn’t seem to be one available, that I could find and so we ended up watching Lost Land of the Volcano, which was actually pretty cool. I really like the fact that Lily seems to be old enough now, to enjoy watching nature programmes. I feel like it is something we can both sit down and enjoy together, and it makes for a nice starting point to talk about different animals and countries and as a set up for different craft activities.

Anyway, I digress… After a failed attempt at finding a relevant nature documentary, we sat down at the kitchen table and Lily chose which bird picture she wanted to paint with her plant based watercolours.

The Crafty Kitty | Painting a Woodpecker

Here she is painting a Great Spotted Woodpecker. I ordered her the RSPB first book of birds, from our local library and we used this as a reference point for the painting.

The Crafty Kitty | Checking the reference book

Here she is checking out the picture of the woodpecker in the book, which is cunningly protected inside one of our A4 plastic zip bags.

The Crafty Kitty | Owl Painting The Crafty Kitty | Woodpecker Painting The Crafty Kitty | Blue Tit Painting The Crafty Kitty | Robin Painting

Lily chose to paint an owl, woodpecker, blue tit and robin. None of which, we actually saw when we went out birdwatching at our local park!

We wandered around our local duck pond, as I knew we would definitely find some birds there! On the way down to the pond from the car park, we spotted:

  • Magpie
  • Woodpigeons
  • Crow
  • Gulls

Lily took a few pics of the birds and then we fed them some bread, before going on a loop around the pond.

The Crafty Kitty | Taking Pictures of Birds

We spotted:

The Crafty Kitty | Canada Goose

  • Canada Goose
  • The Crafty Kitty | MallardsMallards

The Crafty Kitty| Coot

  • CootThe Crafty Kitty | Moorhen
  • Moorhen

Once we had made a loop of the pond, we set back down by the pond, where we originally fed the ducks and we had a look through the bird book, to see if we could identify the birds.

The Crafty Kitty | Birdwatching

and then we chilled out a little bit more, just looking at all the birds…

The Crafty Kitty | Watching the birds

Birthday Bunting

We were due to have a little birthday party for Lily and Isaac’s Grandad last weekend. Sadly, we have had to rearrange until this coming weekend, but I thought I would show off the birthday bunting that the kids made TOGETHER… ah the bliss of a successful collaborative art project!

The Crafty Kitty | Toddler Painting

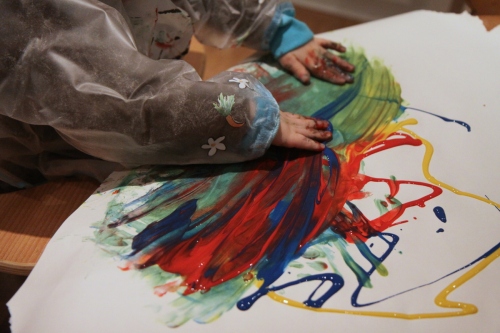
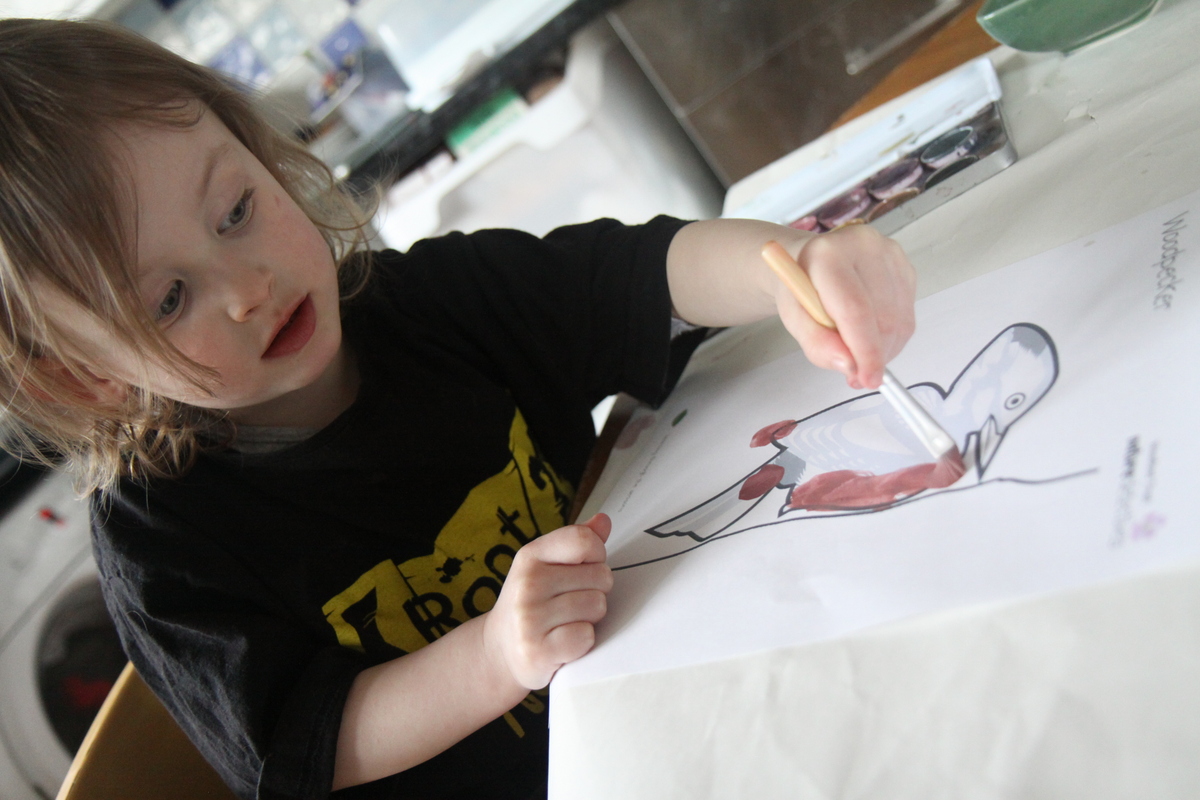
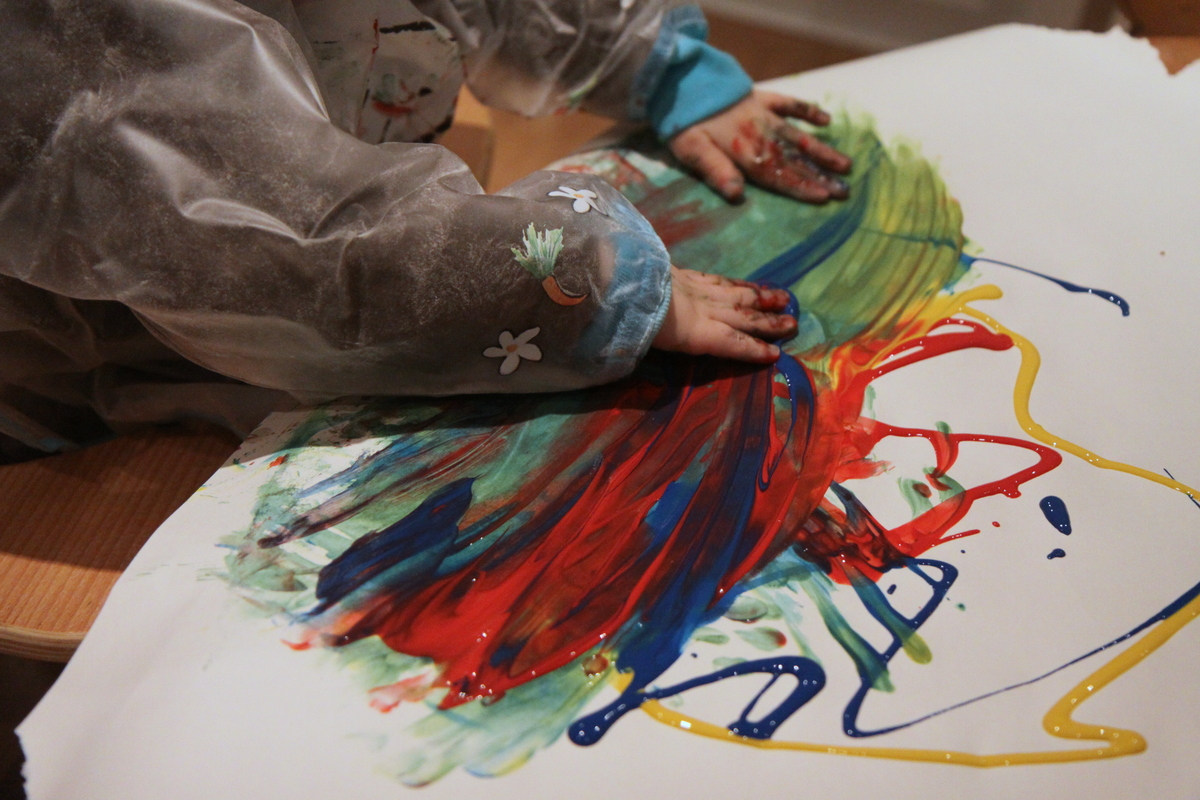
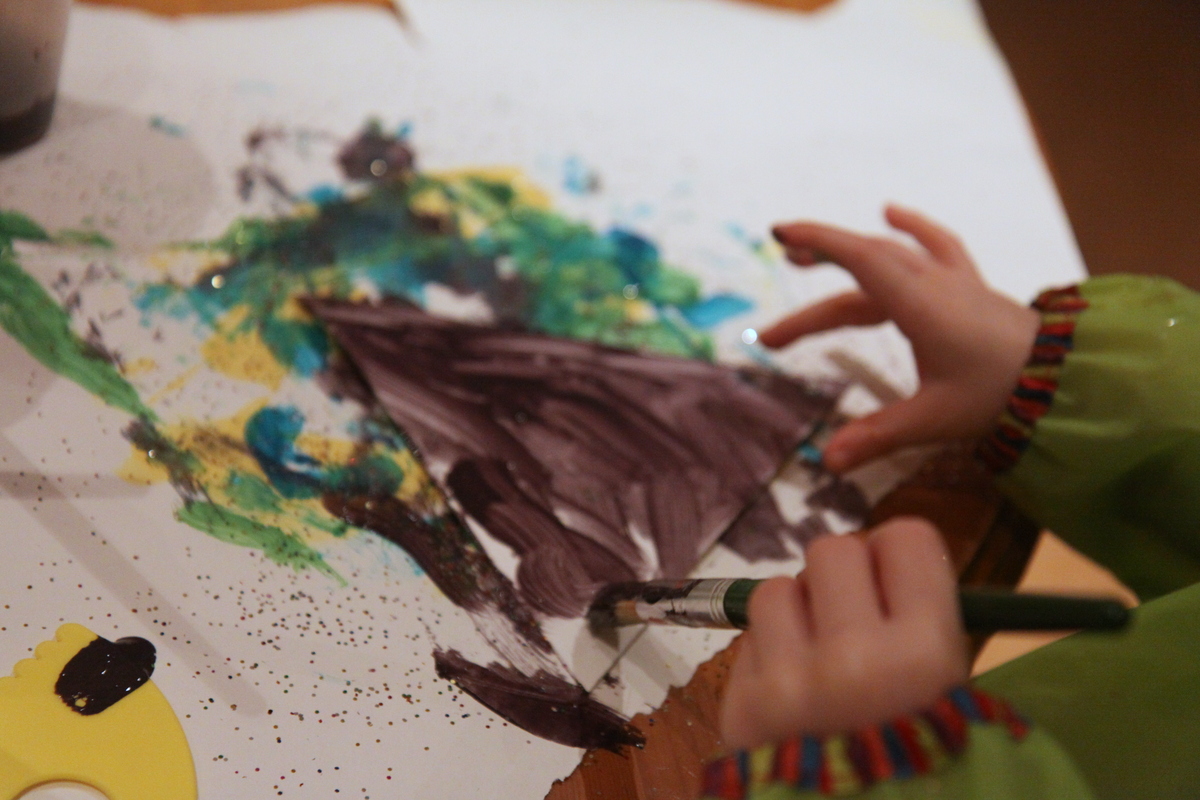
Lily (3 years 8 months) got started straight away on painting the bunting flags, and initially I had intended to just let Isaac (18 months), just play with the paints. I squeezed out red, yellow and blue paint and using his hands, demonstrated what to do. We had one very small incident of a finger with paint on being tasted, but I told him no and then demonstrated the painting “technique” again, and I guess he was just having too much fun painting, as he didn’t try to eat the paint again (that I saw…).

The Crafty Kitty | Painting Bunting with hands

As Isaac, seemed to be enjoying the painting process so much I gave him one of the bunting flags and by this stage he was pointing at the bottles of paint that he wanted me to squeeze out, so I did the same sort of thing onto the bunting flag, let him smoosh it around and then replaced it with a new one, when it was finished!

The Crafty Kitty | Painting Bunting Flag

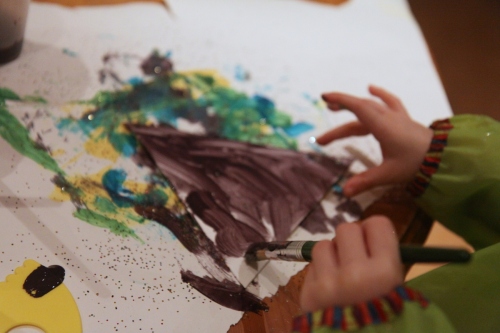
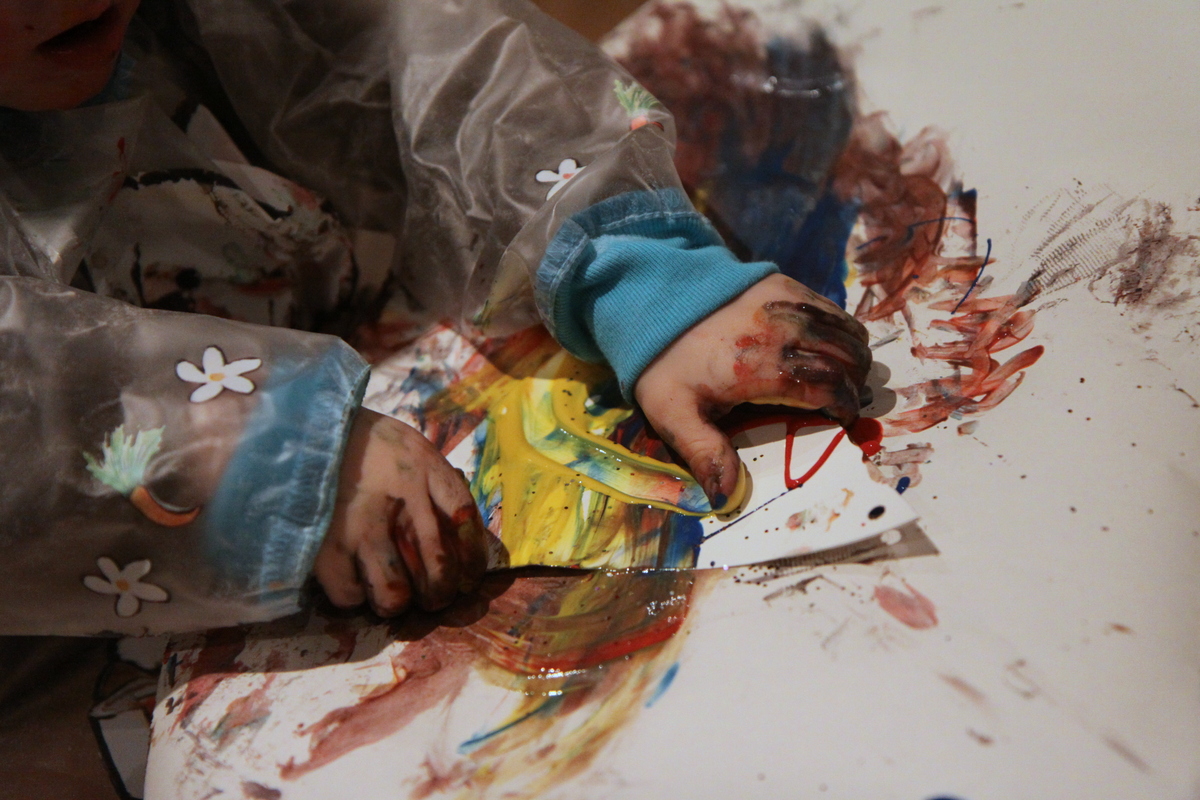
For Lily, I had four pots of paint, with a different colour (that she chose) in each and a separate paintbrush for each. She also had a pot of glitter with a special sprinkling lid and a plastic comb (?) that when you scrape through the paint, it leaves a pattern. I’m sure there is a special name for this, but I can’t think of it right now. As you might be able to tell, the painting process happened in the evening.

The Crafty Kitty | Threading Bunting onto Cord

The next morning, Lily helped to thread the flags onto some cord. Originally it wasn’t going too well as every time she tried to push the cord through the punched holes, it would split. Then I put a little bit of masking tape around the end and it kept the cord small enough to go through the hole, really easily. Obvious really, but I guess I must have thought it would have made the cord too big to fit through the hole or something!

The Crafty Kitty | Threading flags onto cord

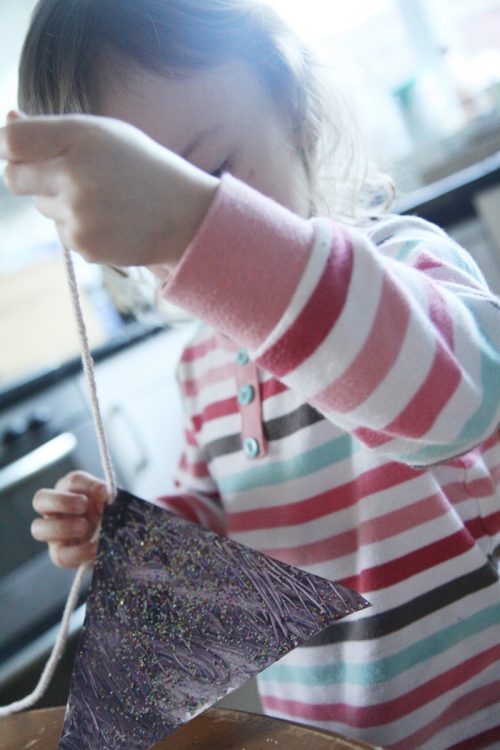
Sunday Morning in your pyjamas craft! Although, to be honest, the main reason she was still in her pyjamas, was because we were about to cook some S’mores brownies and Lily wanted to wear her party dress that day… chocolate cake and party dress-not a good look! Lily has actually been doing and enjoying a few bits of sewing lately, I have another project of hers to share, when I finish writing up the blog post, so this was a great repetition of the skills she had been using for sewing.

The Crafty Kitty | Close up of bunting

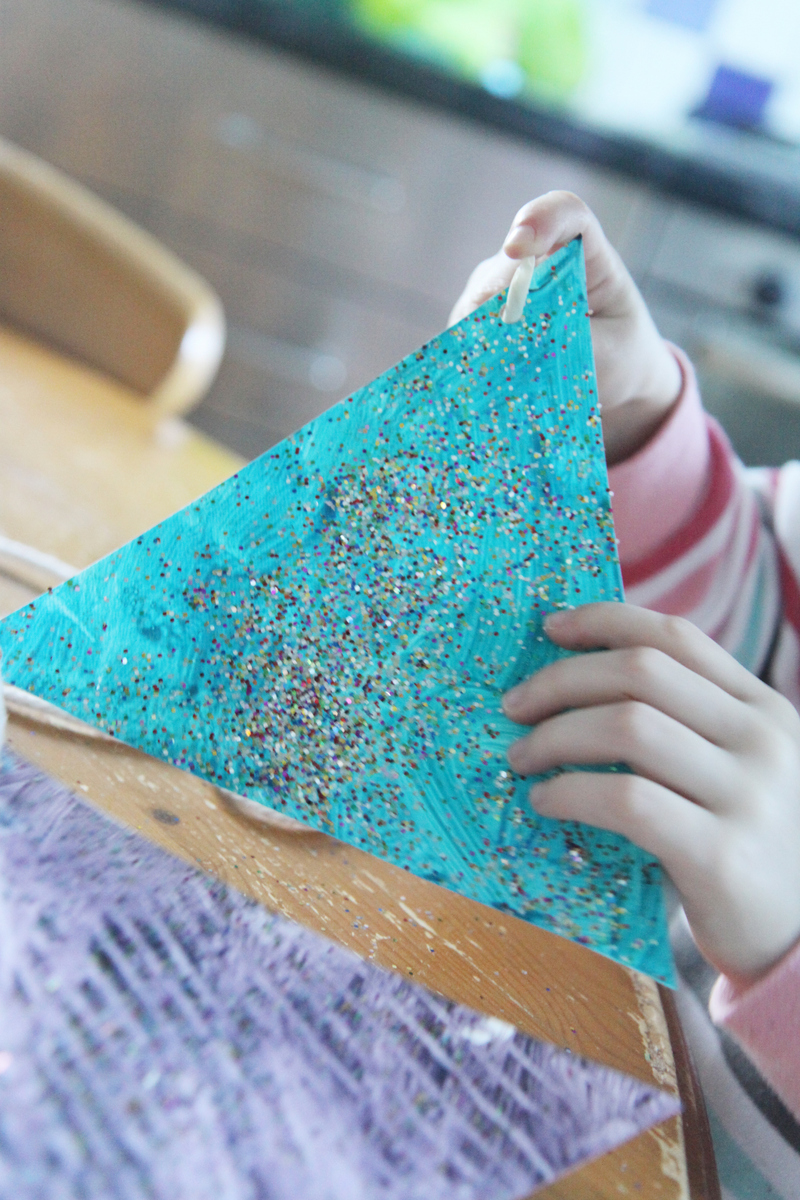
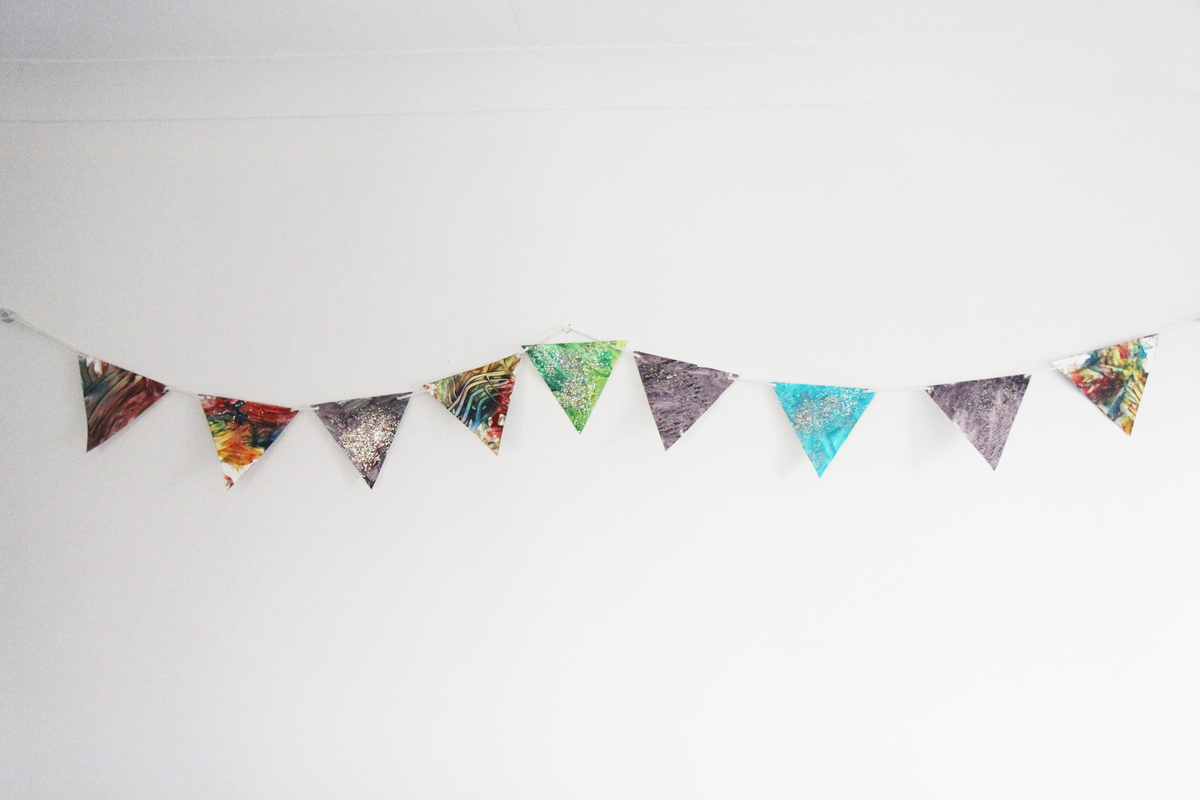
Here is a close up of the bunting. The flag on the left is one of Isaac’s and the other two are Lily’s. The middle flag she used yellow initially and then added the green on top. The right hand flag you can just about see that she used the comb/scraper thingy to make a pattern.

IMG_2820

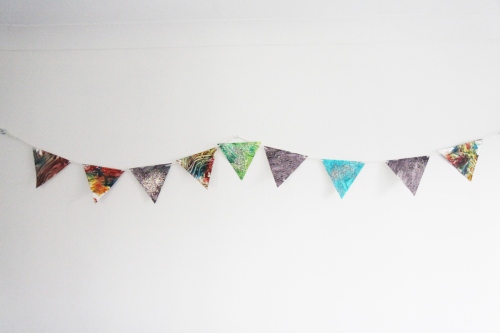
Here is the full line of bunting. I think it turned out really great and the kids had a fantastic time making it. The bunting is making our living room nice and cheery until this weekend, when it will be accompanied by paper chains and balloons! All items that Lily thinks are wonderful!

Materials used: